
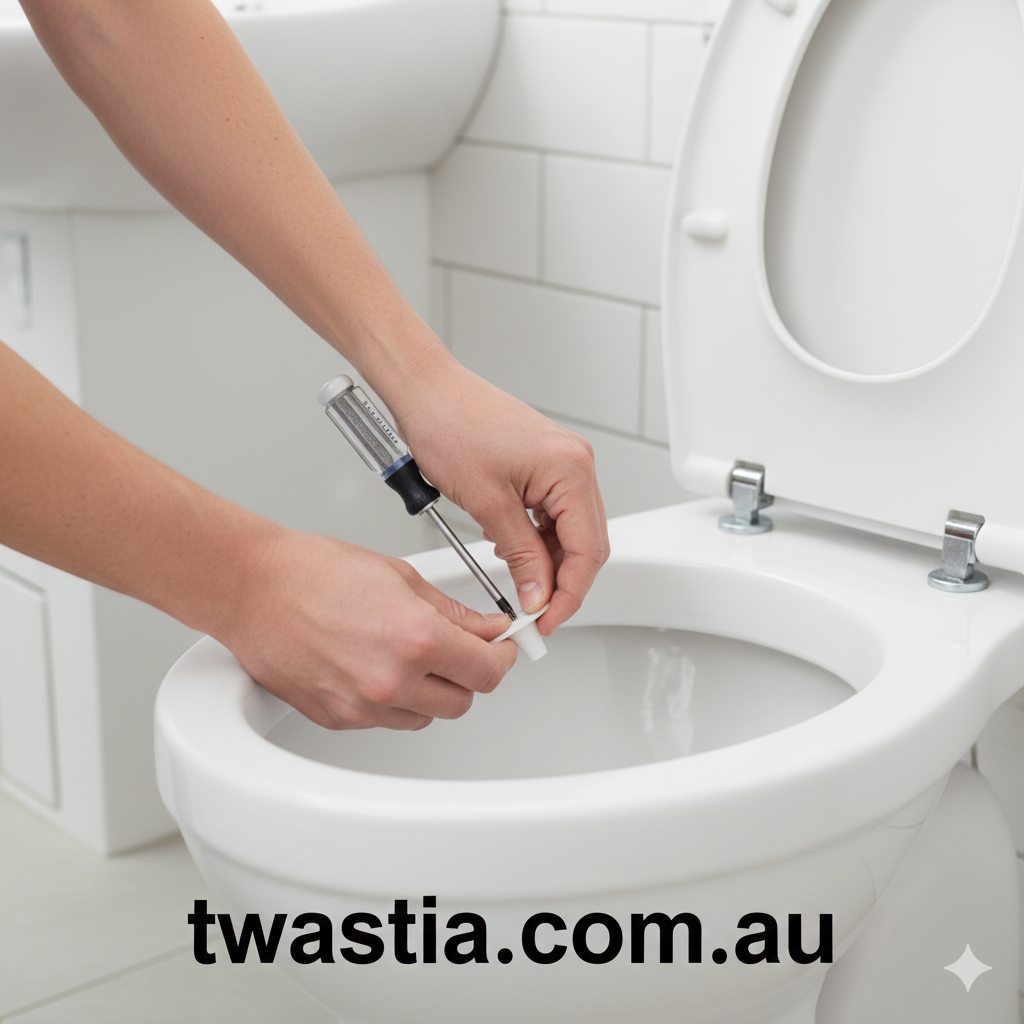
To remove a toilet seat, lift or pry open the plastic caps covering the hinge bolts. Hold the nut under the bowl with pliers and unscrew the bolt from above. Once both bolts are free, lift the seat off. For stuck or rusted bolts, apply penetrating oil or carefully cut them. This method ensures safe, damage-free removal.
Introduction
If you’re wondering how do I remove a toilet seat, you’re not alone. Many homeowners face this task when upgrading, cleaning, or replacing their toilet. The process may seem tricky due to hidden bolts, tight spaces, or corroded hardware. This guide provides an expert, step-by-step approach, showing you standard, quick-release, and top-fix designs. You’ll also learn troubleshooting tips, cleaning techniques, and safety measures. With these insights, removing a toilet seat becomes simple, fast, and stress-free. This in-depth article includes detailed breakdowns, comparisons, and practical advice for any bathroom setup.
Understanding Toilet Seat Mounting Types
Most toilet seats attach via two bolts at the back of the bowl. Standard seats use visible bolt-and-nut systems. Quick-release seats have buttons or levers that let you lift the seat off without tools. Top-fix or concealed bolts require accessing a hidden plate to remove the hardware. Knowing your seat type before starting makes removal easier and prevents damage. Recognizing whether your seat is bolt-based, top-fix, or quick-release ensures a smoother process and avoids unnecessary frustration.
Tools You Will Need
Before removing a seat, gather essential tools: a screwdriver, pliers or adjustable wrench, penetrating oil, and optionally a small hacksaw. Gloves protect your hands from grime or rust. Inspect the hinge area for plastic caps or covers hiding the bolts. Proper tools and preparation save time and make removal safe. For tight spaces under the bowl, a narrow-jaw wrench or flashlight helps. Having everything ready ensures the process is smooth, precise, and damage-free.
Removing Standard Plastic-Bolted Seats
For standard seats, first pry up the plastic caps covering the bolts. Hold the nut underneath the bowl with pliers and unscrew the bolt from above using a screwdriver. Remove one bolt fully, then repeat on the other side. After both bolts are free, lift the seat off. This process is quick, usually taking five to ten minutes. Proper technique avoids porcelain cracks and ensures the seat can be reinstalled securely later.
Handling Quick-Release and Top-Fix Seats
Quick-release seats have buttons or levers built into the hinge. Pressing these releases the seat for easy removal without tools. Top-fix seats may have hidden bolts accessible only through a plate. Remove the plate, then unscrew the bolts from above. These variations simplify or slightly complicate removal but are manageable with correct inspection. Understanding your seat’s mechanism ensures safe removal and prepares you for reinstalling a new or cleaned seat.
Dealing With Stubborn or Rusted Bolts
Older toilet seats may have corroded bolts that are difficult to remove. Apply penetrating oil and let it sit for 10–15 minutes. Try loosening the bolts again with pliers or a wrench. If they still won’t budge, carefully use a hacksaw to cut through the bolt. Protect the porcelain with masking tape or a putty knife to avoid scratches. Patience and proper tools prevent damage and allow safe removal in difficult cases.
Tool Tips for Tight Spaces
Cramped spaces under the toilet bowl make unscrewing bolts tricky. Use a basin wrench, narrow adjustable wrench, or socket wrench for a better grip. A flashlight ensures you can see the nut clearly. This prevents dropping hardware or applying force at the wrong angle. With proper tools, even stubborn bolts become manageable. Expert insights show that preparation and the right equipment are key to a smooth DIY removal process.
Removing the Seat and Cleaning the Area
After loosening the bolts, lift the seat straight off the bowl. Clean the hinge area thoroughly with disinfectant or mild soap to remove grime, rust, or limescale. Cleaning prevents bacterial buildup and prepares the surface for a new seat. This simple step also ensures that reinstalled hardware will stay secure. Proper maintenance improves longevity and keeps your bathroom hygienic. Always inspect the area before attaching a replacement seat.
Why Proper Removal Matters
Correct removal avoids cracking the porcelain, stripping bolts, or damaging the hinge area. Applying proper technique ensures the seat remains stable for future use. A damaged bolt or forced removal can lead to costly repairs. Taking your time and following the step-by-step method keeps the toilet safe and functional. Properly removed seats also make future cleaning or replacement effortless. This careful approach saves money and stress.
Advanced Cases: Bidet or Electronic Seats
Electronic and bidet seats may include electrical connections and water lines. Disconnect power and water supply before attempting removal. Some may require removing side-mount bolts or hinge plates. Understanding your seat type prevents damage and ensures safe removal. Expert advice highlights careful handling, as forcing electronic connections or water hoses can lead to malfunctions or leaks. Planning ahead keeps the process clean and safe.
Handling Stripped or Rounded Bolts
Stripped bolts are common in old plastic seats. Use locking pliers, a larger screwdriver, or a bolt extractor. If all else fails, carefully cut the bolt while protecting the porcelain. Avoid excessive force to prevent cracks. Replacing damaged bolts during reinstallation ensures stability and prevents future removal problems. Proper technique here is essential for safety and longevity.
Preparing for Replacement or Reinstallation
After removal, inspect hinge mounts and bolt holes. Replace old, corroded hardware with new plastic or metal bolts and nuts. Avoid overtightening during reinstallation — snug is enough to secure the seat. Proper preparation ensures stability, reduces noise, and makes future removal easier. Cleaning and inspecting the area enhances durability and performance of the toilet seat. Expert insights recommend always replacing worn hardware for best results.
Dealing With Non-Bolt Seats
Some toilets use clips, expansion plugs, or concealed mechanisms without visible bolts. Identify how the seat is held on and gently slide, lift, or pry it free. Check manufacturer instructions for hidden fixings. Understanding the unique mounting system prevents damage and ensures safe removal. Knowledge of your specific seat type avoids frustration and makes the process faster and safer.
Safety Tips for Removing a Toilet Seat
Always wear gloves and use the correct tools. Avoid excessive force to prevent porcelain cracks. Protect the bowl if cutting bolts. Work slowly and evaluate resistance before continuing. Never use heat or open flame. Following these safety tips ensures damage-free removal. Careful handling protects both you and your bathroom fixtures while making the task stress-free. Proper planning and technique are essential.
Expert Summary
Removing a toilet seat starts with identifying the seat type — standard, quick-release, top-fix, or concealed. Expose bolts, loosen or release the seat, and lift off. Rusted bolts may require penetrating oil or careful cutting. Clean the mounting area before reinstalling a new or sanitized seat. Using proper tools, patience, and step-by-step methods ensures a safe, effective, and stress-free process for any toilet
FAQs
Can I remove a toilet seat without tools?
Yes, if it has quick-release buttons or levers. Many modern seats allow easy tool-free removal.
What if bolts are rusted?
Use penetrating oil or carefully cut the bolts while protecting the porcelain.
Will removal damage the toilet?
Not if done properly. Avoid excessive force and use correct tools.
How long does removal take?
Standard seats: 5–15 min. Stuck bolts: 30–45 min.
What types of mounts exist?
Standard bolt, quick-release, top-fix, side-mount, or concealed fixings.
Should I clean the area after removal?
Yes, clean grime, rust, and limescale before reinstalling a seat.
What if the bolt head is stripped?
Use locking pliers, larger screwdriver, bolt extractor, or carefully cut the bolt.
For more info :twastia.com.au